Showing posts with label Food. Show all posts

Saturday, January 11, 2014

Soupy Weather Calls for Comfort Food!


It's been raining nonstop for two days here in NC, and the weather have run the gamut.  Earlier this week, it got down to 8 degrees (VERY rare here!) and today, though not so cold, we have flash flood warnings.  Either way, it's perfect weather to stay inside with a nice comforting meal.

When it's chilly or rainy outside, my family loves to eat soup of all kinds.  It's easy, can be super healthy, and economical.  Today, we'll enjoy split pea soup with a small twist.  When I was a girl, you couldn't get me near pea soup--the color alone reminded me of all sorts of unappetizing things--boy, was I missing out!  It's DELICIOUS and customarily flavored with ham but today, I use Johnsonville's Sausage Slices--the mild Italian variety, combined with our favorite split pea soup recipe from Allrecipes.  Just substitute the sausage slices for the ham.  I even threw them in frozen because they're precooked and flavor the soup as it cooks!

Look for these in your grocery store freezer.  They are GREAT to have on hand for quick weeknight dinners, and would be fantastic in pastas also.  They contain no MSG, and are gluten-free. 


Eat well today!


Monday, January 6, 2014

School Lunchbox--Beyond Chicken Nuggets


Both of my daughters get a packed lunch every day.  My oldest is 11 and likes to pack her own, using the ingredients we choose together.  I like having control of what my kiddos eat during the day, plus we like to stress healthy options.

My youngest is 4, and is MUCH more picky than her sister ever was!  She could live on chicken nuggets and strawberries so finding alternatives that she will eat warrants a victory dance! 

Recently, the folks at Johnsonville sausage sent me two of their newest products to test:  Frozen, ready to eat meatballs and sausage slices.  Find more about the different varieties here: http://www.johnsonville.com/meatball

One of the proteins my picky preschooler will readily eat is sausage.  We almost exclusively buy Johnsonville because of the quality of the ingredients, and it tastes so darn GOOD!  We've eaten the frozen meatballs (just heat them in the microwave or simmer on the stove) in typical spaghetti and meatballs, and meatball subs, but my favorite way to serve them is in my preschooler's lunchbox!  I'm so happy to have something that she loves besides chicken nuggets.  Above is a sample of one of her lunches, and I'm thrilled to report that she happily eats everything.

I encourage YOU to replace your kid's nuggets with these meatballs in their next lunch--I think they'll love them as much as we do!

In my next post, you'll get a recipe using Johnsonville's frozen sausage slices.  I can't say enough about how wonderful these newest offerings from Johnsonville are!

Sunday, November 3, 2013

Thanksgiving in a Dish--What to do with all those leftovers?


You have tons of turkey.
Mounds of mashed potatoes.
A surplus of stuffing.
And a variety of vegetables. 

You guessed it, this describes the day after Thanksgiving, when the leftovers seem kind of.........leftover.  I accepted the challenge this month presented by Allrecipes.com and Kraft Foods to turn Thanksgiving leftovers into a family-pleasing casserole.  It worked!  You'll want to bookmark this recipe for an easy Black Friday meal.

Recipe by KRAFT

Kraft Thanksgiving Leftovers Casserole Recipe Link

Ingredients:     

  •                 
  •                 
  •                 
  •                 
  •                 
  •                 

Directions

  1. Heat oven to 375 degrees F.
  2. Prepare stuffing as directed on package; spread onto bottom of 13x9-inch baking dish sprayed with cooking spray.
  3. Combine turkey, mixed vegetables and mayo; spoon over stuffing.
  4. Mix potatoes and cheese; spread over turkey mixture. Sprinkle with paprika.
  5. Bake 30 to 40 min. or until heated through.

 *I added 1/2 tsp dried thyme, 1/2 tsp poultry seasoning to step 3, and this recipe is so versatile that you can add your favorite seasonings, vegetables, and your own homemade stuffing.  If you have leftover gravy and cranberry sauce, serve it with the portions.  My family loved it, and it reminded us of a shepherd's pie. 

If you have a smaller crowd for Thanksgiving, this would be a fun alternative to a large spread. 

Will you take this Leftover Challenge?  I'd love to hear about it!


Saturday, September 28, 2013

Eat More................Bison!

Hello lovelies.


This month, I was fortunate enough to team up with Allrecipes as they helped The Bison Council launch!  It's a protein I had never tried before but after reading about the benefits, I plan on incorporating it into my menu more often.  Here are some facts from The PR Newswire Release, including some well-known chefs who have taken part in the bison initiative:

'Bison meat is lower in cholesterol than both beef and chicken, and contains less saturated fat than beef. As an essential resource on all things bison, The Bison Council will dispel common myths and reestablish this protein as a wise option for red meat lovers.
To help spread the word, three nationally-recognized food and health professionals have teamed up as ambassadors for this delicious protein to draw attention to bison's many nutrition facts. The Bison Council's founding ambassadors include five-time James Beard Award nominated chef and owner of Chicago's mk The Restaurant, Michael Kornick; MS, RD, television host and best-selling author, Ellie Krieger; and nationally-acclaimed food writer and founder of Meatopia, Josh Ozersky.'

I was asked to prepare an amazing cut:  Short Ribs!  We love beef short ribs because they're cooked low and slow in order to infuse the flavors of the recipe into super tender meat.  These bison short ribs did NOT disappoint, and my family loved them just as much.  Don't be intimidated if you've never cooked bison or short ribs, this recipe makes it easy.  You sear the ribs and then......wait for it...........they linger in your slow cooker for hours until they're ready for dinner!  The flavors of soy sauce, orange juice, garlic, and fresh ginger permeate the meat and once plated over rice, watch your beef-eaters convert!  These are incredibly delicious, I wish I could invite you over for dinner. 

Find the recipe here:

What do you think?  Is bison something you're interested in trying?  

Tuesday, August 20, 2013

Bacon Makes Everything Better...............Now I Believe it!


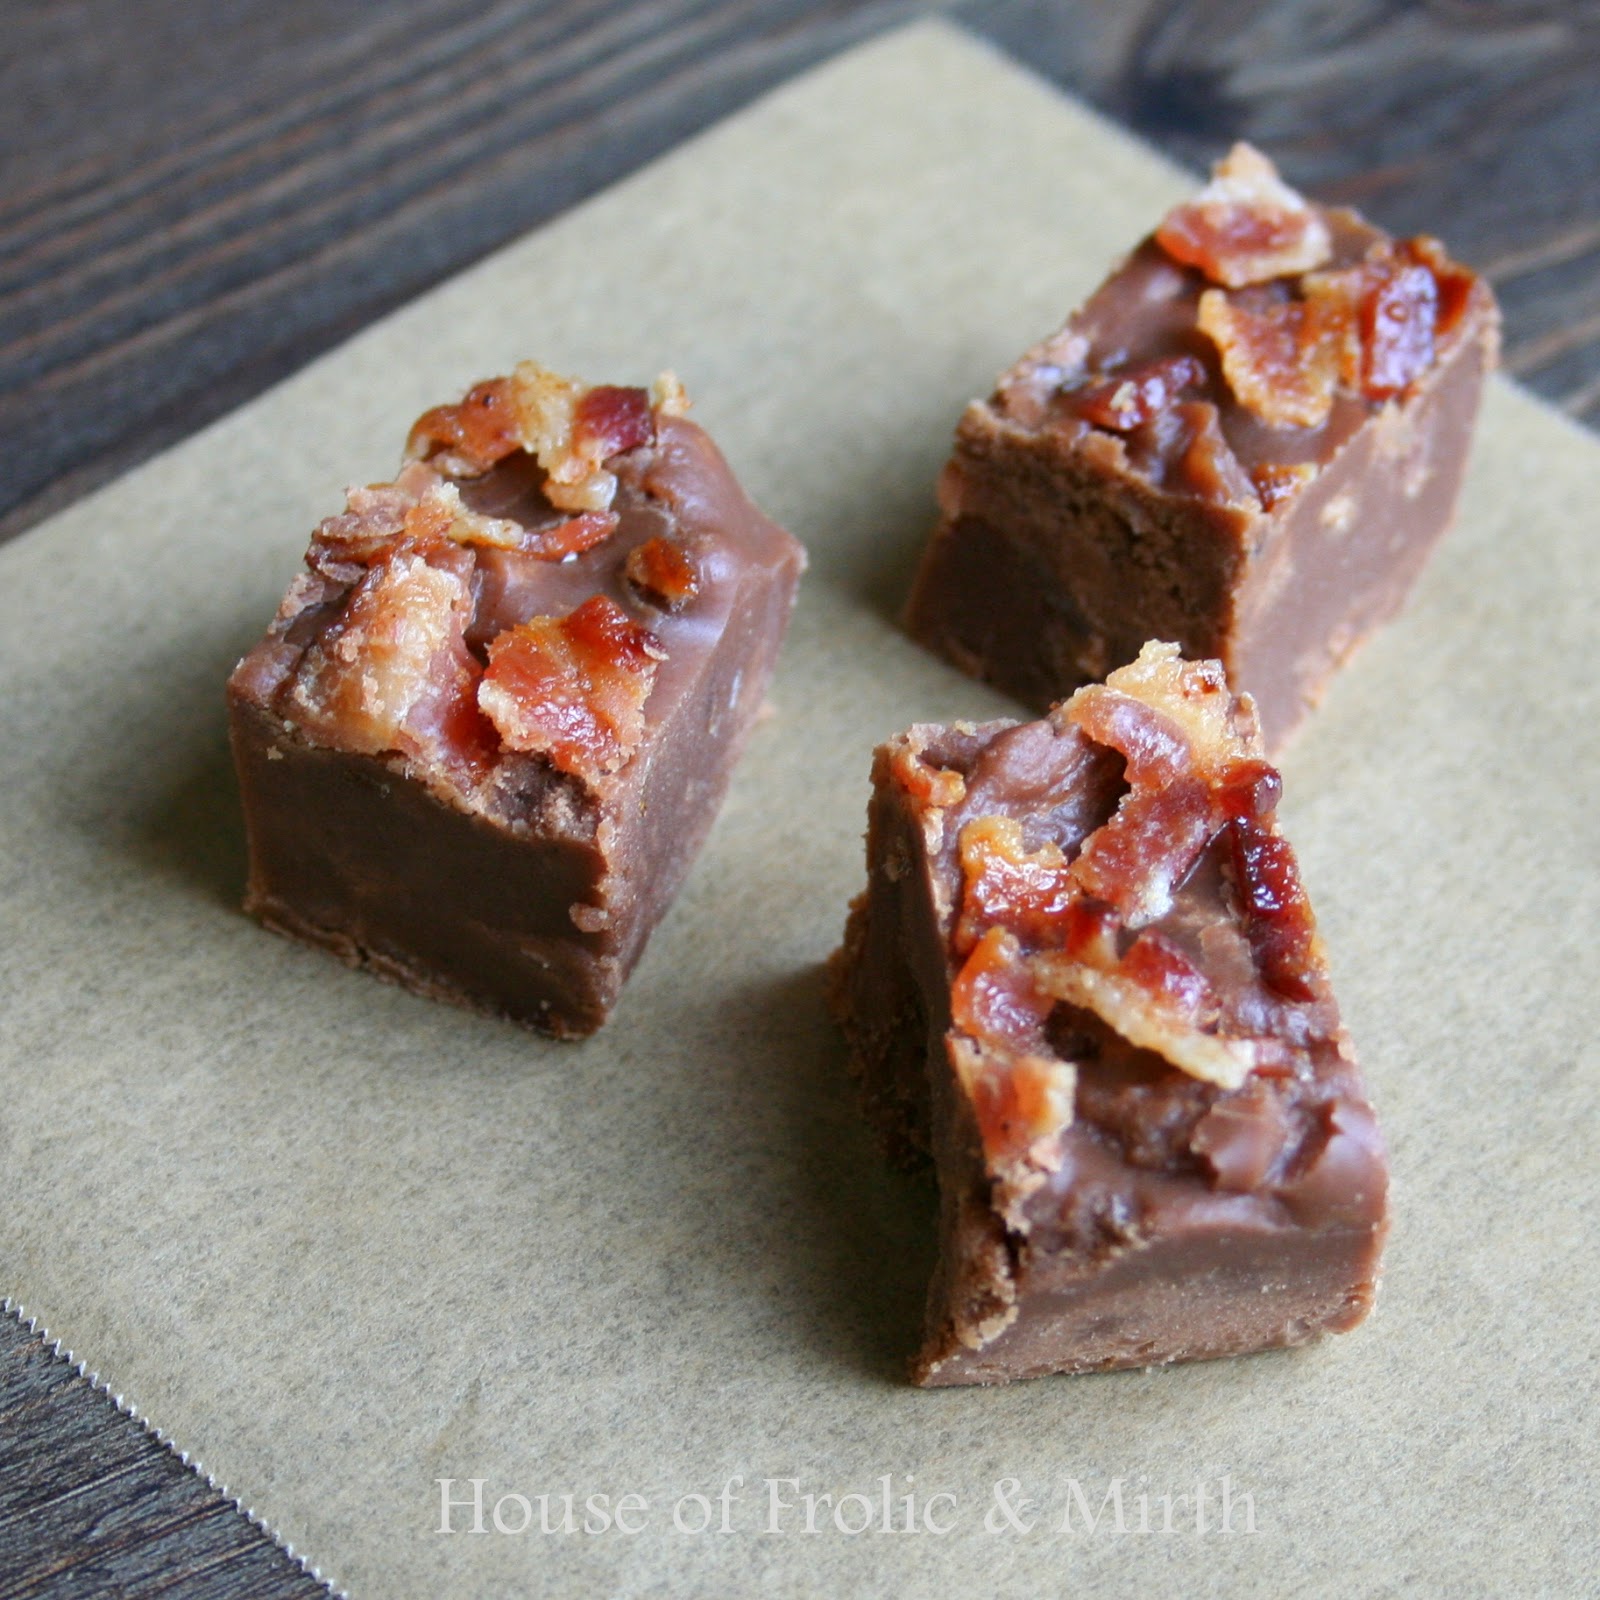
I stumbled upon a recipe for fudge with bacon and immediately KNEW I had to make it.  I mean it has BACON, CHOCOLATE, and they could be eaten at the same time!  This is so delicious, even my preschooler asks for more. 
I tweaked this recipe just a bit.  Plus, I'm stubborn and don't own a candy thermometer so by default I had to guess how long the cooking time should be, but it worked.  It can for you, too.
 
MAPLE BACON FUDGE
 
You'll need:
 
1/2 pound of good smoked bacon
1 tbsp real maple syrup
2 1 oz squares of unsweetened chocolate (I like Baker's brand)
3/4 cup milk
2 cups of white sugar
3 tbsp butter, sliced
2 tbsp vanilla extract
 
Directions:
  1. Cook bacon until crisp, crumble into a small bowl, add the maple syrup, and toss to glaze the bacon.  Set aside.
  2. Stir milk and chocolate in a large saucepan over low heat until chocolate melts and mixture is thoroughly combined, 2 to 3 minutes; stir in sugar all at once. Whisk mixture, trying to clean the sides of pan as much as possible.
  3. Bring the mixture to a boil and cook, stirring constantly, until a candy thermometer inserted into the middle of the fudge reads 236 to 238 degrees F (110 to 115 degrees C), or candy forms a soft ball when dropped into cold water. *This process could take 30-40 minutes.  Remove from heat as soon as candy hits the correct temperature and stir in glazed bacon, reserving 1/8 cup for the top (optional).
  4. Place butter squares onto fudge mixture and pour vanilla extract over the top. Allow to cool for 10 minutes.
  5. Line an 8x8-inch baking dish with aluminum foil and coat with butter or vegetable oil spray. When fudge has cooled for 10 minutes, stir in the butter and vanilla extract thoroughly & pour into the prepared pan.  Sprinkle the reserved bacon on top and gently press it into the fudge.
  6. Refrigerate for 1-1/2 to 2 hours. Cut into small bite-sized pieces to serve.
You won't believe how good this is. 

If you're a fan of salty & sweet food combinations, do not hesitate and make this immediately.  It might become your newest favorite, and this would make a fantastic addition to Christmas trays.  It's not too early to think about it!

Enjoy~


Wednesday, August 14, 2013

The Unconventional Grill


 I'm not much of an outdoor griller, but I'm dangerous with my indoor grill pan!  Today, I'm sharing two of the newest grilling recipes I found that my family went crazy for.  First up, Strawberry Goat Cheese Bruschetta.    This is AHHHH-MAZING!  If you are a fan of goat cheese like me, fire up your grill pan now and get cooking!  The grilled bread combined with the tangy goat cheese and balsamic-glazed sweet strawberries makes for an intensely flavorful combination.


Plus, they are so pretty they deserve a closeup.....

Feel free to substitute cream cheese for the goat cheese--but why would you want to do that?


Next is one of those recipes that makes you say, "Now why haven't I thought of that before?"  You grill cucumbers, red bell pepper strips, and pickle them for a day or two and you get smoky, lovely Pickled Grilled Vegetables.

Next time, I'd like to add grilled carrots too.  Isn't this neat?  And if your kids like pickles like one of mine does, this could be another way to get them to eat their vegetables.  I'm holding out hope for my youngest's taste buds!


Tuesday, August 13, 2013

Beef Part Deux


Continuing yesterday's post, today I'm sharing a fantastically delicious salad that can be made in a matter of minutes:  Beef Steak Salad with Dried Cherries

I tweaked it a little, as I normally do depending on what I can find, but oh my goodness is this GOOD!  After slicing and marinating the steak, you stir fry it and top your favorite salad greens.  I used a smoked blue cheese, which blended beautifully with the other ingredients.  Try this today, it's a perfect light lunch or great party fare! 

Monday, August 12, 2013

Beef--It's What's for Dinner, and Lunch, and Maybe Breakfast!

Oh Friends, do I have some great recipes to share today!  It's beef month for me, and National Cattlemen's Beef Association along with Allrecipes is promoting quality recipes made with your favorite meats.  First up is a chili recipe that has five different options--I made three of them.  All start with the same original recipe, and then the variations have additional ingredients added.


Here is where to start--this is probably one of the easiest chili's you'll ever make! Add your favorite toppings to boost the flavor. Beef Chili Five Ways is a wonderful recipe for those learning how to cook, or anyone wanting a quick and simple dinner. 


To make it a Mexican version, start with the original recipe and simply add a tablespoon of cocoa powder and top with cilantro, pepitas, and tortilla chips.


Next is my FAVORITE!  This was incredibly good, and my entire family loved it (even my normally-conservative-palated husband.  Don't say that five times fast!)  To the original, add 1/4 teaspoon of pumpkin pie spice, 1/4 cup of golden raisins during step 2.  Garnish with Toasted sliced almonds, fresh chopped mint, and a dollop of Greek yogurt.

Options 4 and 5 I'll try later, but here are the steps if you'd like to:

Italian Variation: Prepare recipe as directed above, adding 1-1/2 teaspoons fennel seed with ingredients in step 2. Before removing from heat, stir in 3 cups fresh baby spinach. Cover; turn off heat and let stand 3 to 5 minutes or until spinach is just wilted. Serve over hot cooked orecchiette or cavatappi, if desired. Garnish with grated Parmesan cheese and pine nuts, as desired.

Cincinnati Variation: Prepare recipe as directed above, adding 3 tablespoons white vinegar and 1 teaspoon ground cinnamon with ingredients in step 2. Serve over hot cooked elbow macaroni. Garnish with chopped white onion, sour cream and shredded Cheddar cheese, as desired.

Enjoy! 

Sunday, October 7, 2012

Simple & Easy Food Photography: What I do


One of my first photos from when
my hobby began--the cake I made for
my daughter's 4th birthday--not great, not awful


Peanut Chocolate Chip Cookies
Shepherd's Pie
Maple Cannellini Bean Salad


Most of you know that one of my favorite hobbies is cooking and then photographing the finished product.  I love photography in general, but food doesn't move (unlike my girls).    By no means do I consider myself  an expert on this, but I do get asked every now and then how my photos turn out the way they do. In this post I'd like to share some simple things I do to try and get the best food shot.

First, the camera.  I purchased a used Canon Rebel xt off of eBay a couple of years ago.  As my hobby progressed, I knew I wanted a more "substantial" camera, and got a good deal on this one.  It came with the standard 18-55mm lens that I use for most pictures--it takes good photos of nature, food, and still life shots.  My most recent purchase was a 50mm lens, pictured on the right.  It is good for portraits and close-ups of food.  My favorite setting for this type of photography is the active setting--the icon that looks like a running man on the dial.  I go against the grain here, but you can never know when you'll have to go quickly between taking a photo of your daughter playing soccer and a plate of spaghetti.  Also, I never use the flash because I feel like it washes out the photo and makes everything too bright.  But that's just me.

This photo was taken using my iPhone 4S--great picture capability as well! 
I use it when I want to be more inconspicuous, like in restaurants. 
If you ever go out to eat with me, chances are, I will take a picture of my dinner. 
And maybe yours.
Don't be discouraged if you don't have a top of the line camera.  Many phones take excellent photos once you learn how to tweak the settings.  Do a little research online to find the tips that relate to your specific phone and you'll be improving in no time!

Next, lighting is key.  There are some sophisticated and great ideas out there for ways to set up lighting for food, but I prefer to keep it simple.  While I shoot all over the house depending on my mood, my favorite, most dependable lighting spot is this corner of my dining room table.  It's right next to the window, and it can't be beat for the photography I like to do.  Plus, I like the background the wood gives.


Please ignore the sad landscaping outside of the window.  My hydrangea is ready for Fall.
 
Here are two identical photos with different backgrounds.  I ended up choosing the second one because I liked the richness of the wood under the plate.
 

PB&J Pancakes on a White Dishtowel
PB&J Pancakes on Dining Room Table


Regarding backgrounds, it's fun to be creative.  There is a lot you can do to change up the background, and give a whole new feel to your food photos.  I like to match the food to the feel of the photo (if that makes sense).  For example, here is a pecan pie I recently made:


Pecan pies remind me of picnics, and this one made its way to a family reunion.  A nice chippy picnic table is what I needed for this particular photo.  What?  I don't have a nice chippy picnic table?

Here's a secret for you:


< < < This is real chippy wood.

And this is scrapbook paper!  Can you tell the difference?  Neither will those who view your photos......the orange is what I plan on using for some Halloween and Fall backdrops.  The neat thing is, scrapbook paper comes in many different colors and styles, and it's super-affordable.  You don't have to spend lots of money to get the shot you're hoping for.  The white chippy paper set me back 59 cents.


Last, plating your food is HUGE.  If what you've prepared is plated well, it makes those viewing your photos want to eat it and try the recipe in their own home.  If you can get someone's mouth watering over a photo, you've done a great job!

Here is part of my plating stash:

Stacked in the cabinet
A variety of plates
(which includes our everyday dishes)


Small plates and cups--great for plating little
portions, soups, dips, and casseroles for
good close-up photos
Pretty dish towels for added color

I like to find plating dishes at Goodwill, TJMaxx, and on clearance.  Even one $2 dish can make an impact in a photo, you don't have to spend an exhorbitant amount.  My all-time favorite plates/saucers came from Goodwill.  They are pristine white, which really makes the food pop:

A dishtowel makes this "homey"


The white plate enhances the color of the food


Honey Butter on one of the Goodwill plates
Always save room for dessert!


One final note--I do use Picasa free editing software to crop and slightly tweak my photos.  Sometimes the lighting isn't exactly right, other times I feel like it needs a subtle boost to enhance the color.  NEVER do I try to make food look overly bright or colorful, you can tell when a photo is overprocessed to the point of looking unnatural.  If you start with a picture that's in focus, has decent lighting, and has been plated well there isn't a lot you have to do to it.  It takes practice over time to develop the eye for what constitutes a nice food photo.  Sometimes, it takes 10 pictures to get the shot you're looking for.  I'm not perfect by any measure, but I do love when someone tells me they're drooling because of a picture they've seen.  And then, when they eat it and are happy I know I've met my goal!

It's so much fun, and through my voluntary position as a Brand Ambassador with Allrecipes.com, I feel like I've had the opportunity to develop a hobby that I love while feeding friends and family food they like to eat and view.  I hope some of these tips have given you the encouragement to try food photography for yourself.  But don't be surprised if you get some weird looks along the way when people realize that you take pictures of food.........


Related Posts Plugin for WordPress, Blogger...